In Cinema 4D, have you ever needed to lock an animating camera from editing, protecting it from the inadvertent moving of a camera that can sometimes happen during production?
For example:
- I accidentally cause the render camera to move by bumping an input device, or through some combination of modifier keys and input device Cinema 4D moves my camera when I didn’t intend to.
- Sometimes I need to adjust an element of my scene which requires zooming in or changing the angle to get a better look, and at some point I realize I was actually doing all that with my Render Camera.
- I’ve been given a camera solve for a VFX shot. I’ll never need to change it, I just need it to be locked. But in Cinema 4D, there’s no obvious way to do this.
The Undoing of My Life
We can break down locking a camera into two categories: animating and still. First, locking an animating camera may not seem to be all that important. After all, animated properties can’t be changed unless you specifically keyframe them (assuming autokeying is turned off) so isn’t it pretty much locked from changes already? If I don’t keyframe a property I just changed, that change will go away as soon as I change frames, right? Well, that’s true…most of the time. It will sometimes change my camera when I use the SpaceMouse Wireless by 3DConnexion (basically a 3D mouse).
However, even animating cameras have unkeyframed properties. I may be moving a camera and not changing its rotation, but that rotation property is still susceptible to being changed by C4D’s 123 camera adjustment tools or by a SpaceMouse getting bumped.
But then you say, if I inadvertently change my camera I can just undo, right? Well, undoing is also imperfect. Especially if you didn’t realize you were using your render camera you may have made lots of camera changes before realizing it. And if you were making fine adjustments, how far back do you undo if most views look pretty much the same?
So finding some way to truly lock down your animating camera when needed can be a very useful thing.
Still cameras have more options, first and foremost being the Protection tag which I would probably use a lot of the time, but later I’ll describe why even still cameras can benefit from the locking techniques that I use.
Here are my three solutions, in order of simplicity, for locking an animating camera:
The Layer Method
- Create a layer.
- Put the camera in that layer.
- Lock the layer.
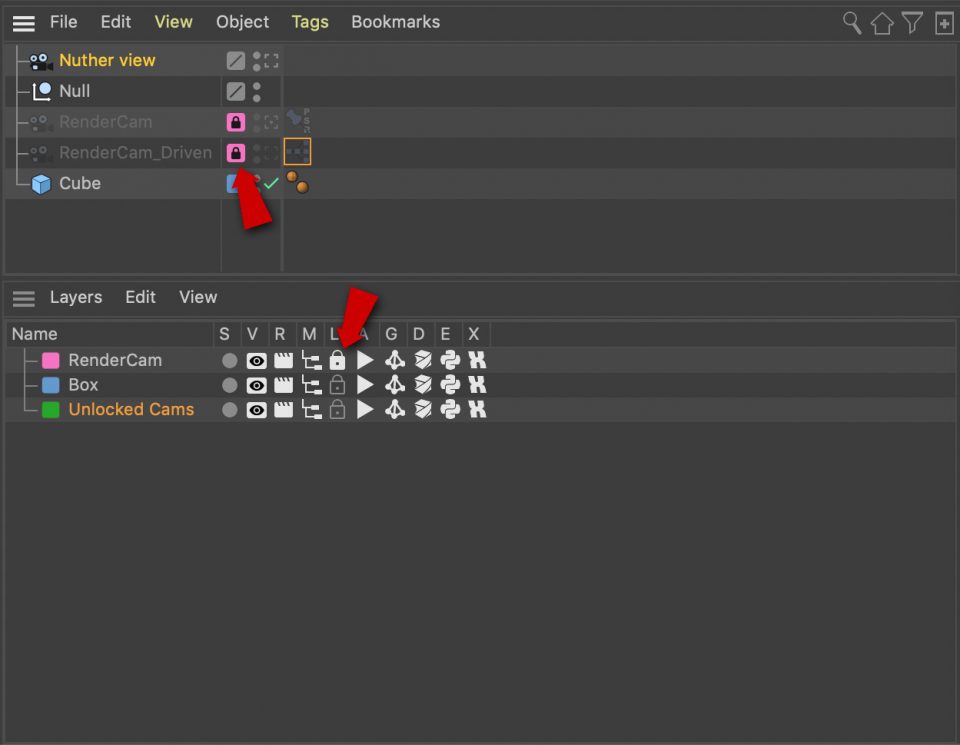
Position and rotation will not change from what you set. However, in my testing I was still able to change the camera with the SpaceMouse, but if you don’t own one this may not be a problem. Also, If you then change the render view (the square with the dot inside) to another view and then want to go back you’ll no longer be able to do that in the Object Manager, although it IS still selectable from the Viewport’s Cameras menu.
Pros:
- Easy to implement.
- Doesn’t require Xpresso.
Cons:
- Doesn’t protect you from camera changes by the 3DConnexion SpaceMouse.
- In the Object Manager, the camera can’t be selected as the render view.
Xpresso Set Driven Method
- Get your camera the way you’d like it. This will be the source camera.
- Duplicate the camera, which will be the target.
- Right click on the source camera’s Position in the Attribute window (not the X, Y, or Z, but any P to the left of those) and choose Animation->Set Driver.
- Now go to the Position for the target camera and choose Animation->Set Driven.
- Do the same for the source camera’s rotation.
- Select the target camera as the render view.
Icons that look like a rectangle with a triangle on the left side of it show up where the keyframe bullets would be. This signifies that these properties are part of a driver:driven relationship. The target camera is now immunized from position and rotation changes. If for some reason you need to make a change, temporarily switch your render camera to the source and make your changes there, then switch back to the target when you’re done. Of course, if you need to change anything besides position or scale (like, say, focal length) you’ll need to create a driver:driven relationship for that too.
With this method you can still change your position or rotation in the viewfinder, but like before, it will get erased as soon as you change frames.
Pros:
- Your “actual” camera is always kept safe from changes since it is never used directly.
Cons:
- You can look like you’re changing the camera, even if the change doesn’t take, so it can be disconcerting sometimes.
- Requires using Xpresso (although you’re shielded from having to use it directly).
Xpresso Global Matrix Method
Similar to the above method, you’re linking parameters on a source camera and target camera, and then using the target camera. But this time you’re using the camera’s Global Matrix property, which is kind of like position, scale, and rotation all wrapped up into one.
- After duplicating your source camera to create the target, select the target camera.
- Create a new Xpresso tag in the Object Manager by going to Tags Menu->Programming Tags->Xpresso.
- Drag over your source camera from the Object Manager into the Xpresso Window, which will create a node.
- Similarly, drag over your target camera from the Object Manager into the Xpresso Window to create another node.
- Click on the red rectangle to the right of the source node name and choose Global Matrix to make that property linkable.
- Click on the blue rectangle to the left the target node name and choose Global Matrix to make that incoming property linkable.
- Link the two properties.
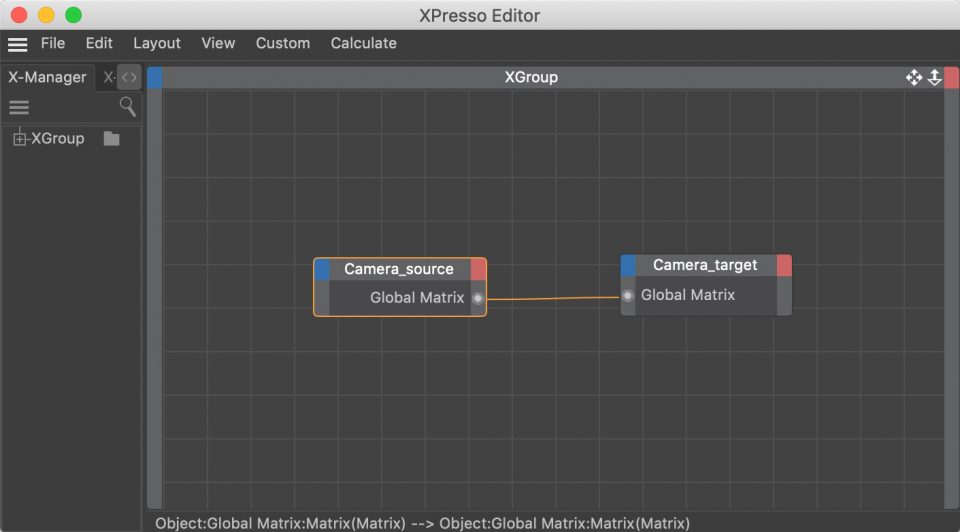
Now position, scale and rotation are linked between the two cameras. And unlike the Set Driven method where you can appear to change the camera but it goes away when you change a frame, this method will not even appear to change. The target will act in lock step with the source and will not deviate. Because of that this is actually my preferred method.
Pros:
- Actual camera kept safe.
- Camera will not so much as even appear to change.
Cons:
- Some knowledge (though limited) of Xpresso needed.
By the way, a lot of these suggestions come from a great video from Alpha Pixel about locking objects.
Note: I realized this technique works well for stationary cameras too, which might be more susceptible to change since they don’t have the keyframe crutch to fall back on. For a still camera of course you can also use the Protection tag, but I think once the Global Matrix method is set up, it’s actually quicker and easier to use this method because all that’s involved is clicking on the render view icon to make a change, then switching back, which is easier than selecting the Protection tag, undoing the position and rotation, making your change, then reimposing the lock on position and rotation. I guess how often you’ll have to tweak your camera will determine whether it’s worth it or not.
So there you have it. May you never inadvertently change your camera ever again!